

Author: Vitasystem team · Fact-checked by: Large-format production department
Updated: 2026-10-04
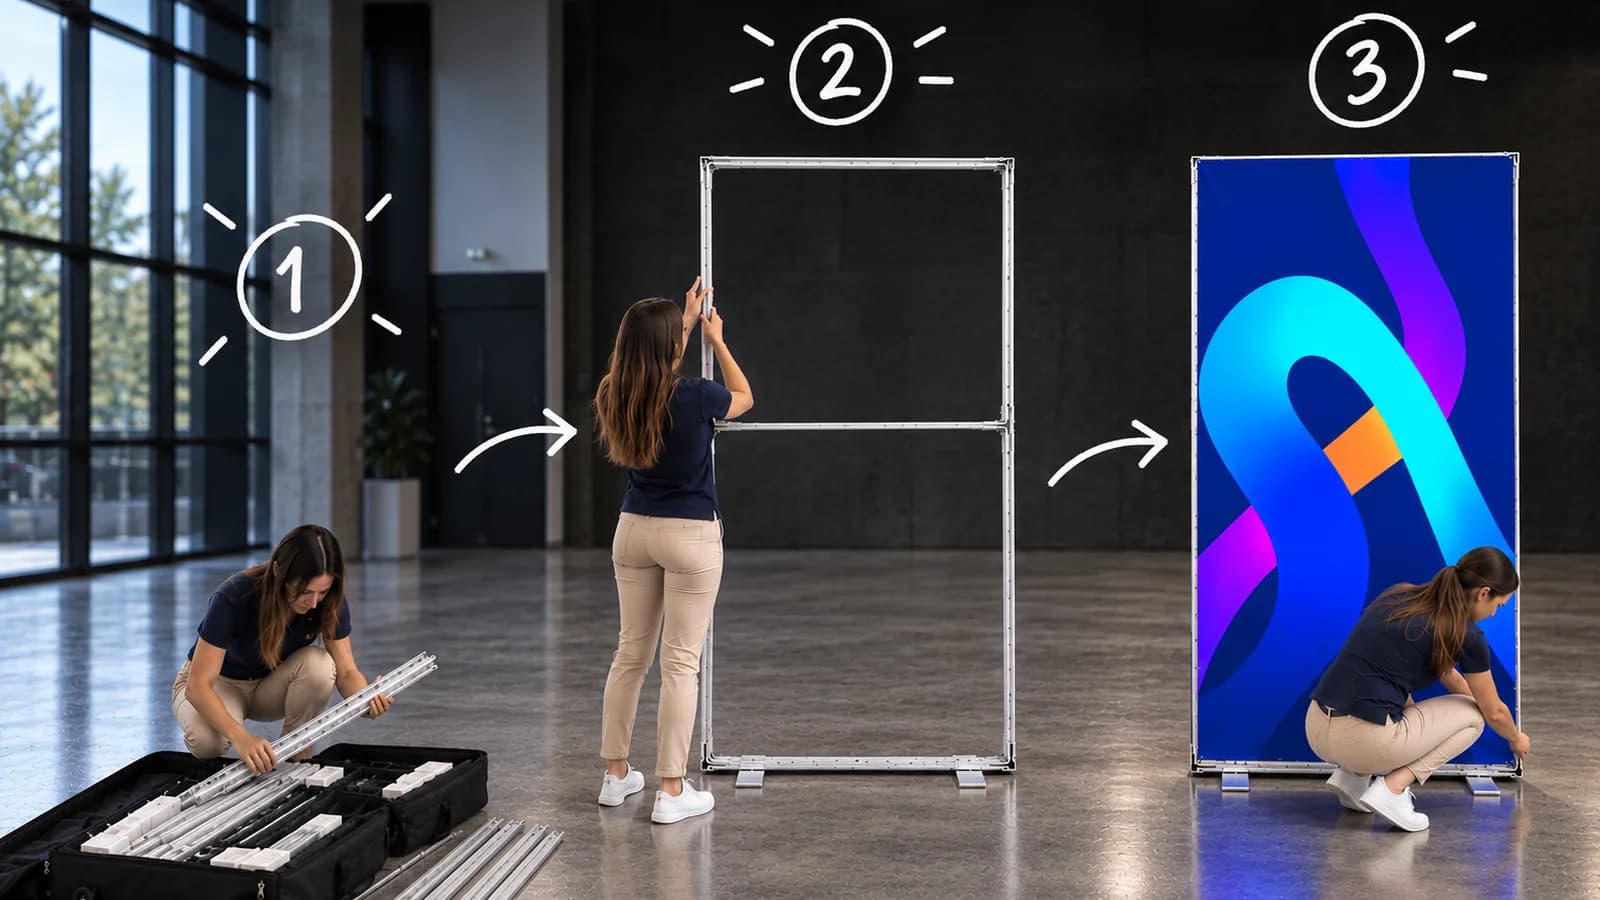
An LED BOX wall looks like part of a permanent build: an evenly tensioned graphic, lit from inside, in an aluminium frame. In practice it is a mobile system. It arrives in a carton, a bag or a case, goes together without tools, and the graphic is fitted in moments. Many people worry before their first event that assembly will be complicated. There is no need.
In this guide we go through assembly step by step according to the manufacturer's instructions, show how to connect the power and fit the SEG fabric, how to pack the wall away again, and finally explain how connectors let you join single walls into corners, long walls and builds with a roof. If you are still choosing a system, also read SEG and LED systems: when does backlighting really make a difference.
What is in the kit and how to prepare
Depending on the series, the kit arrives in a carton (LED BOX 2.0, Compact, wall frames), a bag (FLEX, PLUS) or a wheeled case (PRO). Inside are the aluminium frame profiles with LEDs already fitted, the feet, a 24 V power supply (two in the PLUS series and in the 400 cm PRO) and, if you ordered printing, the SEG fabric graphic with a silicone edge sewn on.
- Lay the parts out on a clean, flat surface, ideally on the cardboard from the packaging, so the profiles do not get scratched.
- Check the markings on the ends of the profiles. You always join parts with the same numbers.
- Place the wall within reach of a power socket. The power supply cable plugs in at the bottom profile.
- Only take the graphic out of its packaging just before fitting it, and do not lay it on the floor.
No tools are needed. One person can assemble a 100 cm wide wall (LED BOX 2.0, Compact, FLEX) in a few minutes. The wider PLUS and PRO walls are easier with two people and take a dozen or so minutes.
Frame assembly step by step
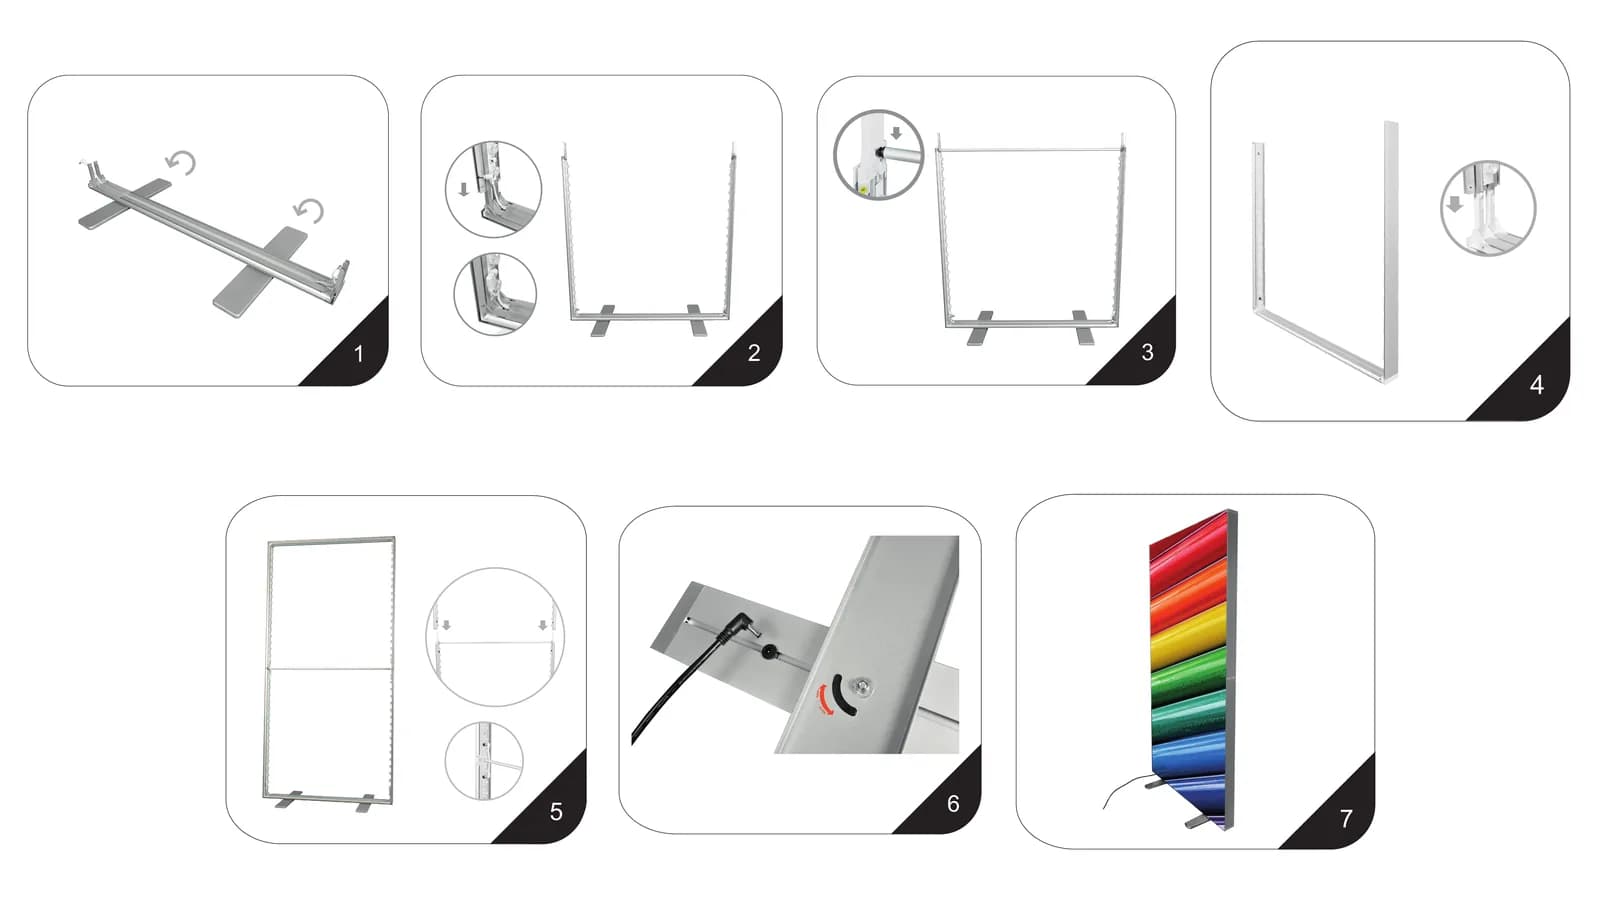
Step 1: turn the feet by 90°
Start with the bottom profile with the feet. During transport the feet lie along the profile so the kit takes up less space. Turn each one by 90° so it sits across the frame, and lay the profile on the floor with the feet facing down. The feet will keep the wall upright.
Step 2: lower frame and cables
Push the side posts into the bottom profile, joining parts with the same numbers. The joints push together without screws. At each joint, also connect the cable plugs. The LEDs in the profiles are powered through quick connectors hidden in the frame, so once assembled no cable sticks out.
Step 3: the crossbar in the middle
Slide the crossbar, the middle bar of the frame, between the posts. It stiffens the structure at half height. In series that have a crossbar (LED BOX 2.0, PLUS and PRO), do not skip this step.
Step 4: upper frame
Assemble the upper half separately: the top profile and the upper sections of the posts, again following the numbers on the joints. It is easiest to do this on the floor, next to the lower part that is already standing.
Step 5: join the top and bottom
Slide the upper part onto the lower part so the ends of the posts go into the joints, and connect the cables at the middle joint. The frame now stands on its own. Check that all joints are pushed fully home: the frame has to be square, otherwise the fabric will not tension evenly.
Step 6: connect the power supply
Plug the power supply connector into the socket in the bottom profile and the power supply into the mains. The LEDs run at 24 V. Before you fit the graphic, switch the power on briefly and check that all LED strips light up. If one stays dark, usually one of the plugs at a profile joint is not pushed in fully. It is easier to fix this now than after the fabric is on.
Step 7: fit the graphic
The SEG graphic has a flexible silicone edge sewn around it. You press it into the groove in the profile with your fingers: no tools, glue or hook-and-loop strips. How to do it so the fabric is perfectly tensioned is described below.
How to fit the SEG graphic so it is evenly tensioned
- Start with the corners. Press the edge into all four corners, making sure the print is straight in relation to the frame.
- Then press in the middle of each side: first the top and bottom, then the sides. The tension will spread evenly.
- Finally run your fingers along the whole perimeter and press the edge in along the full length of the groove.
- On a double-sided wall, fit the second graphic at the back of the frame in the same way.
- If a crease appears, pull the edge out along that section and press it in again, gently pulling the fabric towards the crease.
The graphic can be changed in a few minutes, so one frame serves many campaigns. For the next event you only order new fabric in the same size. You can prepare the design in the 3D Studio on the product page or on the PDF template. How to prepare the file is explained in our guide How to prepare large-format print files.
Dismantling and packing
Dismantling is the same steps in reverse order: unplug the power supply, take out the graphic starting from a corner, lift off the upper part of the frame, slide out the crossbar and take the lower part apart. Before separating the profiles, disconnect the cable plugs, holding the plug rather than the cable.
- Roll the graphic loosely with the print facing inwards and store it separately so it does not get dirty from the profiles.
- Turn the feet back along the profile, the way they lay in the packaging.
- Pack the profiles in the same order they arrived in. Next time you will find the right numbers faster.
- Keep the power supply and cables in a separate compartment or bag.
How assembly differs between the series
The principle is the same throughout: an aluminium frame with LEDs, a 24 V power supply and a graphic with a silicone edge. The series differ in profile, size and packaging.
- LED BOX 2.0, 100 × 200, 230 and 250 cm: the classic tower with a crossbar, silver or black frame, assembled as in the instructions above.
- LED BOX Compact, 85 and 100 × 200 cm: the lightest frame with a 6.5 cm profile, no crossbar, with joints that have no external cables.
- LED BOX FLEX, 100 × 200 cm: an 8 cm profile frame; the structure together with the fabric and power supply fits into a bag.
- LED BOX PLUS, 200 and 300 cm wide: 10 cm profile, a hinge-based structure that speeds up setting up, and two power supplies. Easier with two people.
- LED BOX PRO, from 100 to 400 × 250 cm: the strongest 12 cm profile and a wheeled case. Two people assemble the wide frames in a dozen or so minutes.
- LED BOX wall frames: brackets instead of feet. You hang the frame like a picture and change the graphic without taking it off the wall.
You will find the dimensions, weights and kit contents of each series on the product pages in the LED BOX light walls category.
Connecting walls: connectors and larger builds
A single LED BOX wall is the backdrop of a small stand or a glowing totem at an entrance. The system really shows what it can do when you join several frames: you get a long backlit wall, a corner visible from two aisles or a build with a roof. This is what connectors are for: small fittings that clamp the profiles of neighbouring frames together.
A wall in one line: magnets and inline connectors
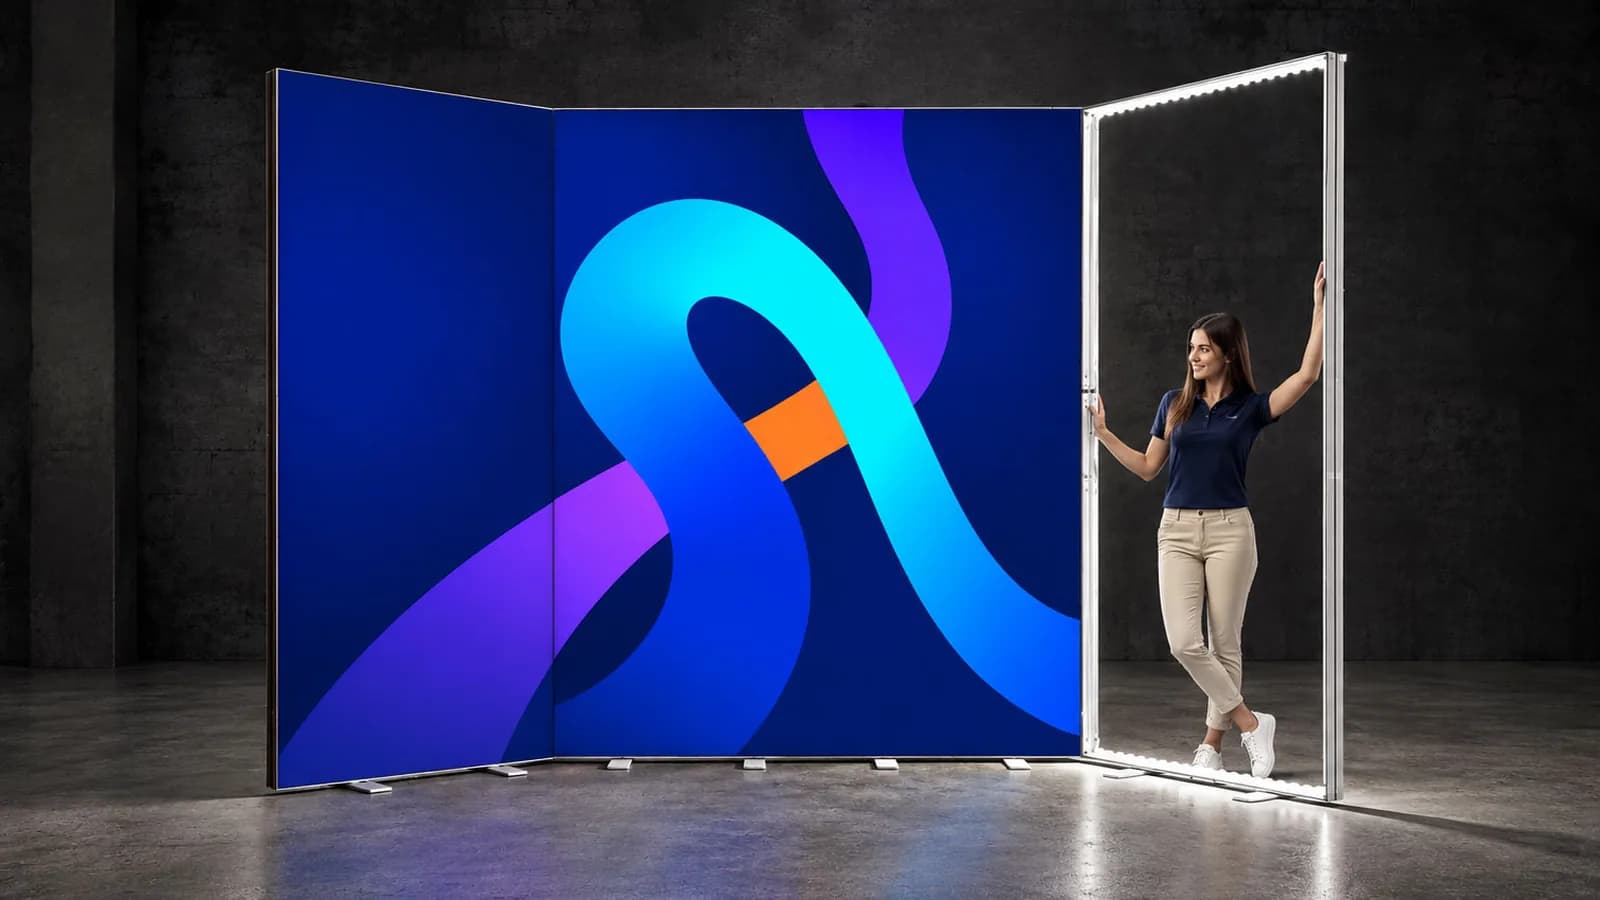
The manufacturer has built magnets into the LED BOX frames. Just bring two walls together side by side and they line up evenly. Inline connectors clamp the profiles together, so several frames form a wall of any length without gaps between the modules. According to the manufacturer, the LED BOX 100 × 230 and 100 × 250 cm kits include inline connectors (4 pcs). For the PLUS series there are separate inline connectors and a top and bottom set with a removal key.
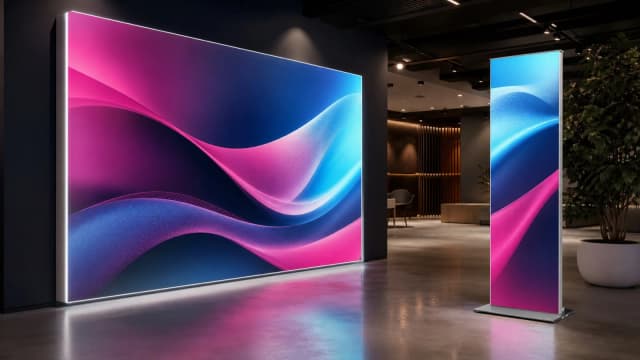
The fabrics of neighbouring walls meet edge to edge, so one motif can run across several frames, as in the photo above. When designing such a wall, prepare a separate file for each frame and make sure your logo and text do not fall on the join between two modules.
A 90° corner: the right-angle connector
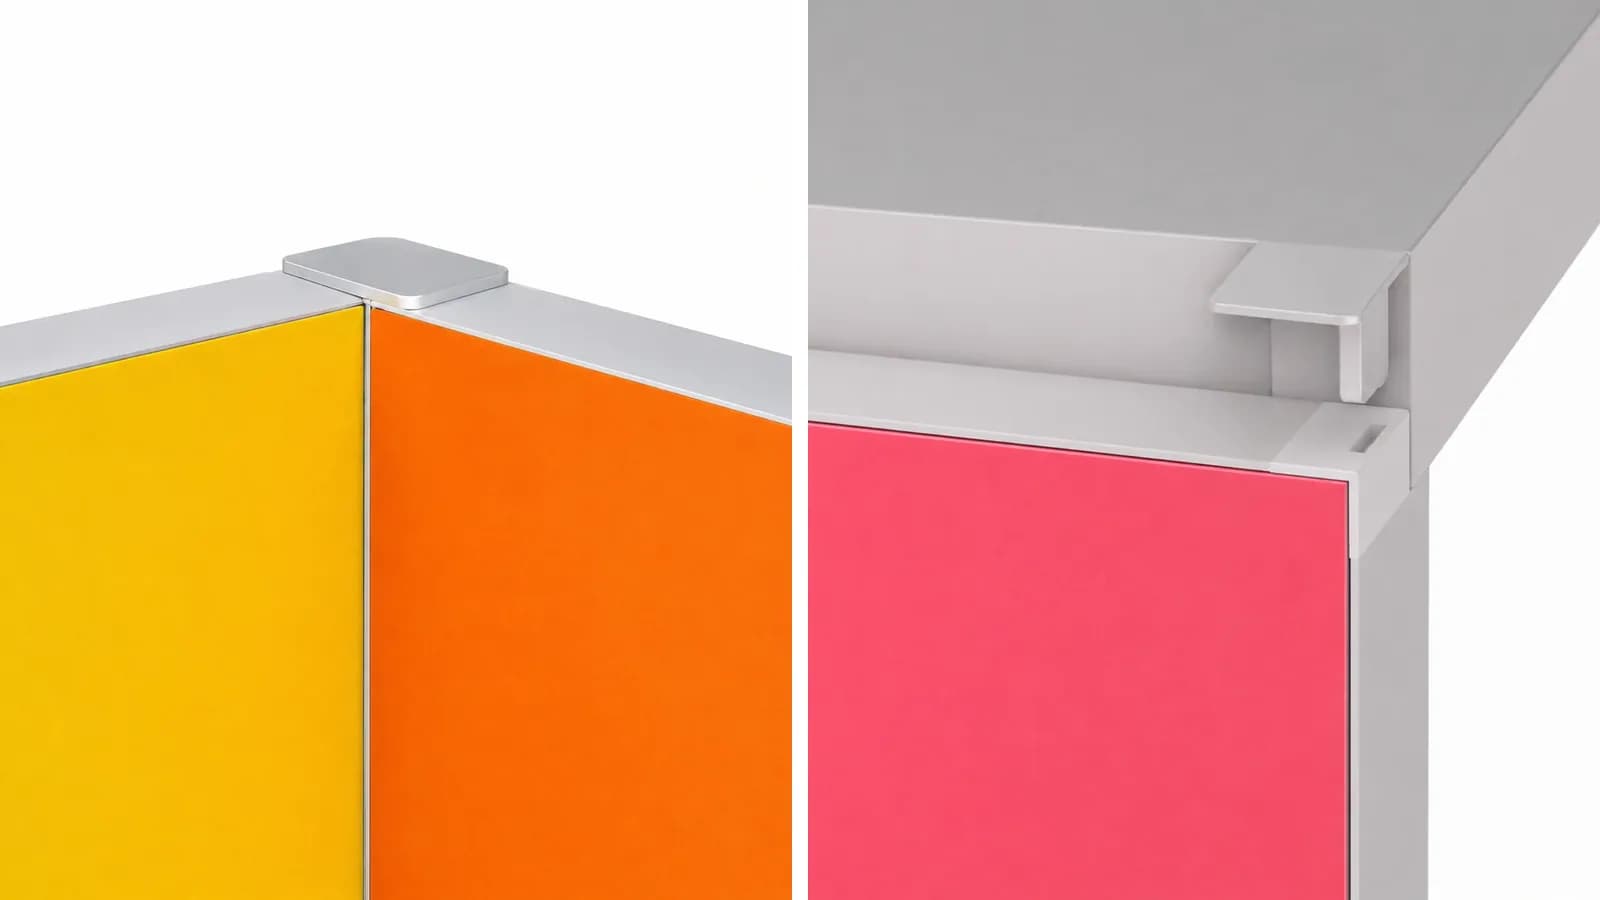
The right-angle connector joins two walls at a right angle. This creates a corner: a glowing wall visible from two directions, ideal for a corner stand or an island. For LED BOX 2.0 the right-angle connector is a set of a top and a bottom connector, and the 90° connector for the PLUS series also comes with a removal key.
A build with a roof and a wall right against the hall wall
In the LED Backlight series you choose build accessories directly in the configurator on the product page:
- 90° connector (2 pcs: top and bottom), €13.30 excl. VAT: joins two Backlight walls into a corner. You order the second wall separately, in any width from 100 to 600 cm.
- Roof connectors (4 pcs: 2 top and 2 bottom), €19.90 excl. VAT: connect a wall laid horizontally, as a roof, to vertical walls. This lets you build a glowing gateway or a backlit canopy over the stand.
- Half feet (2 pcs: left and right), €18.20 excl. VAT: a standard foot sticks out on both sides of the frame, a half foot only on one. The wall can stand with its back right against the hall wall or in a corner.
How to plan a larger build
- Start with a floor plan of the stand. Mark which walls should light up and from which side visitors will approach.
- Join frames from one series. Profiles of different series have different widths, from 6.5 to 12 cm, and the connectors are made for a specific system.
- Plan the power. Each frame has its own power supply, so with several walls a power strip hidden behind the build comes in handy.
- Design the graphic for the whole wall at once, then split it into files for the individual frames.
Not sure which connectors suit your build? Write to us before ordering and we will match the accessories to the series and size of your walls.
The most common assembly mistakes
- Joining profiles without checking the numbers. The frame will go together, but it will not be square and the graphic will not tension evenly.
- Cable plugs not pushed fully home at the joints: some of the LED strips do not light up.
- Fitting the graphic from one side to the other instead of from the corners. The fabric shifts and creases.
- Setting the wall up on an uneven surface. The feet should sit flat on the floor across their whole surface.
- Packing a damp or dirty graphic together with the profiles.
- Disconnecting cables by pulling the cable instead of the plug.
Frequently asked questions
How long does it take to assemble an LED BOX wall?
One person assembles a 100 cm wide wall in a few minutes. The wider PLUS and PRO walls are easier with two people and take a dozen or so minutes. Fitting the graphic itself takes only moments.
Do I need tools?
No. The profiles push together following the numbers, the cables connect with plugs, and the graphic is pressed into the profile groove with your fingers. The 90° connectors and the top and bottom inline connectors for the PLUS series come with a key that makes removing them easier.
Can I join walls from different series?
Connectors are made for a specific system and profile width, so plan your build with frames from one series. If you want to combine different models, ask us before ordering.
Can I change the graphic myself?
Yes. Pull the silicone edge out of the groove, starting from a corner, and press the new graphic in the same way. You order new fabric in the same size separately; the frame stays the same.
Does the wall light up on both sides?
LED BOX 2.0, Compact, FLEX, PLUS and PRO walls are double-sided, and you order single- or double-sided printing. LED BOX wall frames and LED Backlight walls light up on one side.
Summary
Assembling an LED BOX wall comes down to seven simple steps: feet, lower frame with cables, crossbar, upper frame, joining, power supply and graphic. No tools, in a few to a dozen or so minutes. Connectors let you build a wall, a corner or a build with a roof from single frames, and the interchangeable SEG graphic means the same structure will serve many campaigns.
Choose a size in the LED BOX light walls category, upload your graphic in the 3D Studio and see the result on the model before you order.



Comments
Loading comments…