

Author: Vitasystem team · Technical review: Large-format production department
Updated: 2026-09-13
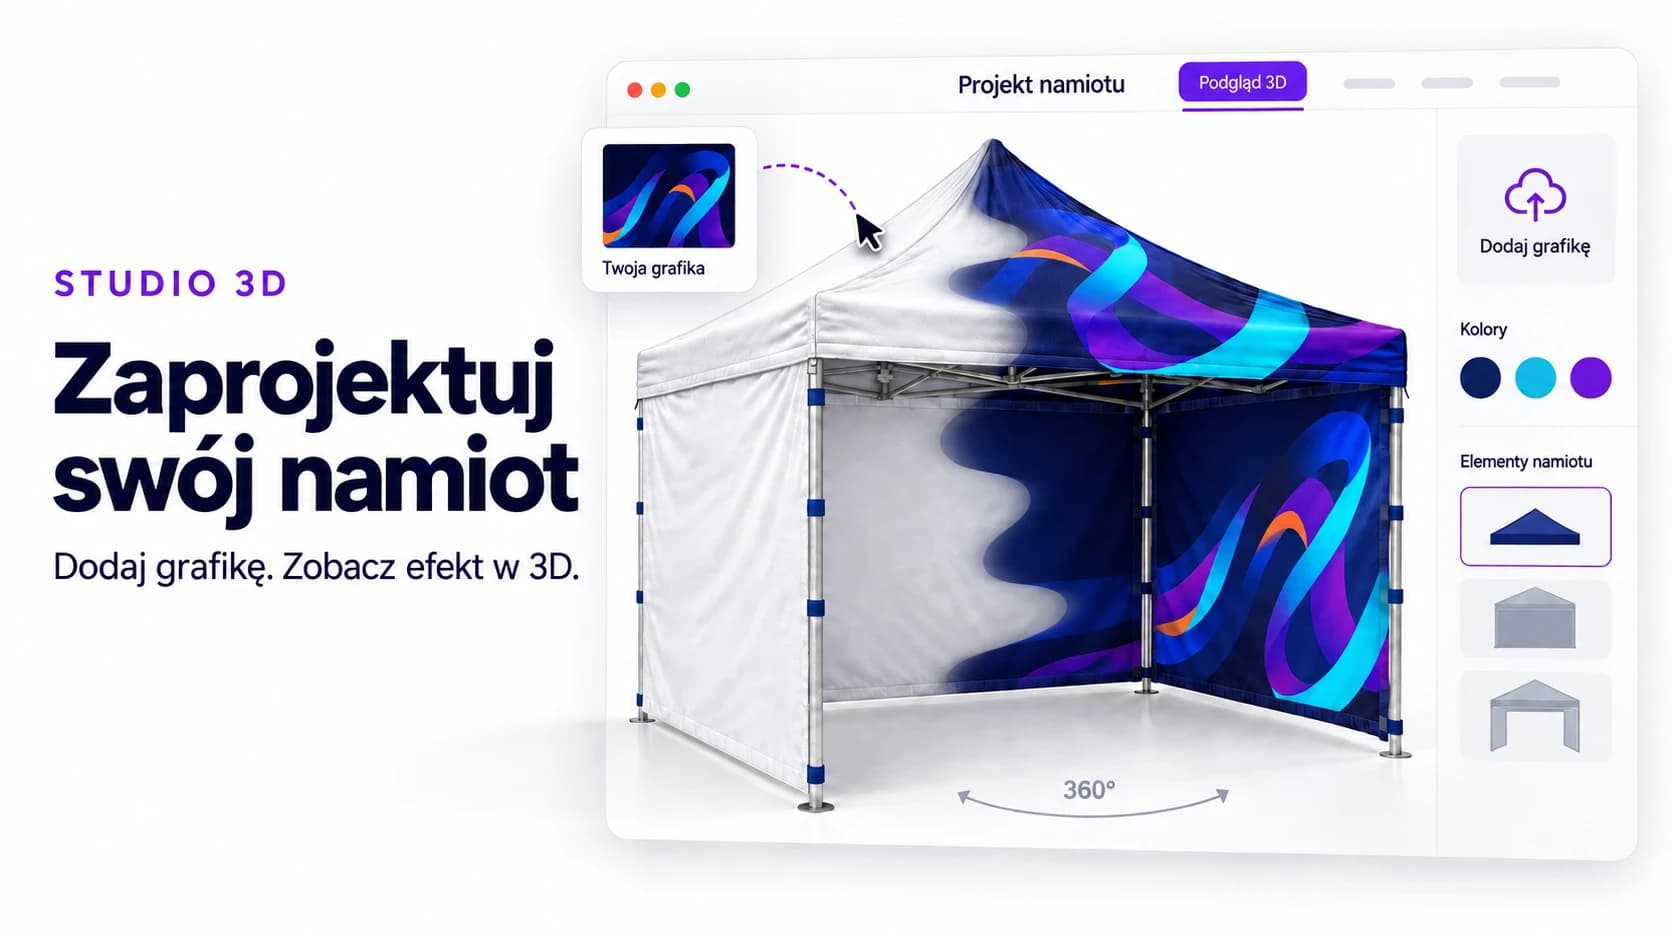
Until recently, ordering a printed tent worked the same way at every print shop: a price table, a form, files sent by email and a wait for the visualisation. Our 3D Studio reverses that order. You build the tent on screen, see it from every side together with walls, table and flags, upload your artwork and immediately check how it looks on the roof. Price and lead time are calculated as you go, and what goes into the basket is exactly what you see. Below we walk through the whole process, from choosing the size to the files our production team receives.
Where to find the 3D Studio
The Studio is built into the product pages of four tents: 2.5 × 2.5 m, 3 × 3 m, 3 × 4.5 m and 3 × 6 m. There is nothing to install and no account to create. Open the product page and, instead of a static photo, you will see a rotating tent model with the options panel on the right. Everything you change in the panel appears on the model instantly.
The Studio runs in the browser on both computers and phones. Designing is more comfortable on a computer, because the options panel and the model sit side by side. On a phone, the model is at the top and you scroll through the options below it.
Step 1: size and frame
You choose the size by opening the relevant product page. The four formats cover four typical situations:
- 2.5 × 2.5 m: an information point, a small market stall or a pitch where 3 × 3 m will not fit. Steel frame.
- 3 × 3 m: our best-selling format. 9 m² under cover, with a choice of aluminium or steel frame.
- 3 × 4.5 m: half as much space again, with room for a counter, a display and a storage corner. Aluminium or steel frame.
- 3 × 6 m: a large stand on six legs. The middle leg divides the front and back into two 3 m bays. Steel frame.
For the 3 × 3 and 3 × 4.5 tents, the first option in the panel is the frame. Steel is included in the price; aluminium costs more, but the set is several kilograms lighter and does not rust. If the tent will travel to events often, choose aluminium. If it will stand in one place for a season, steel is perfectly adequate.
Step 2: walls
Each side of the tent is set separately. For every side there are three icons: no wall, full wall and half wall. One click adds the element to the model, and the price at the bottom of the panel updates with the surcharge. The selected icon is highlighted in purple, so you can see at a glance what is already in the set.
A few practical tips from our projects:
- The most common layout is a full wall at the back and on both sides. The front stays open so customers can step under the roof.
- A half wall at the front works like a counter. It hides the table legs and gives you extra space for your logo at eye level.
- The “Fully enclosed” switch closes the tent on all four sides with a single click. Useful for a back office or storage area on the stand.
- On the 3 × 6 tent, the front and back each have two bays. You can close one half and leave the entrance open in the other.
You do not have to decide everything at once. We print walls, half walls and accessories together with the roof, but you can also order them later for the same frame, in the same artwork.
Step 3: stand equipment
The “Equipment” section adds items to the model that are usually bought separately: a table with a tablecloth, a beachflag on the left and right of the tent, an 85 × 200 cm roll-up and promotional deckchairs. Each appears in the scene to scale, so you can see straight away how much room is left for a walkway and whether two flags side by side will block the entrance.
We print all these items in the same artwork as the tent. If you upload your logo to the roof and the tablecloth, the colours will match exactly, because they come from the same printer with the same colour profile.
Step 4: weights
On grass, the tent is anchored with the pegs included in the set. On paving, tarmac or indoors, pegs will not work, so in the Studio you choose a set of weights for all legs: cast iron, water containers or sandbags. Cast iron is the heaviest and most durable; water and sand are lighter to transport, because you fill them on site.
The bigger the roof, the larger the area the wind can catch. For the 3 × 6 tent, the set covers six legs. In strong winds every tent must be taken down: weights secure it in normal weather, not in a gale.
Step 5: lead time
The standard lead time is 7 working days from design approval. If your event is next week, choose express: 3 working days for a surcharge of €105.90 excl. VAT. Once you select express, a badge appears on the model and the specific planned completion date is shown under the option. We count from the next working day after the order, skipping Saturdays, Sundays and public holidays, so you do not have to check the calendar yourself.
Step 6: artwork on the model
This is where the Studio makes the biggest difference. The “Your artwork” section offers two routes. Choose the one that suits your files.
Route one: upload files to individual elements
Click “Add your own artwork”, choose an element (for example the roof, the left wall or the tablecloth) and upload a photo, logo or finished artwork as PNG, JPG or WebP. A crop window opens: you move and scale the image within a frame shaped like that element, and the model shows the result immediately. Repeat for the other elements. This route works well if you have a logo and photos but no design for the whole tent.
Route two: PDF template for designers
If an agency or designer is preparing the artwork, click “Download PDF template”. You will get a 1:10 scale file with a separate page for each element: roof sections, valances, each wall, the tablecloth, flag, roll-up and deckchair. The page shapes and dimensions come straight from the 3D model, so a design made on the template matches what we print. On the 3 × 4.5 and 3 × 6 tents, the roof has two longer and two shorter sections, so the template includes two roof pages and two valances.
The designer works in Illustrator, Corel, Affinity or Canva, saves the whole document as a PDF without changing the page size and uploads it with the “Upload completed template” button. The Studio reads the pages, crops them to the print area and applies them to the model. Pages left blank are skipped, so you can submit a template with just the roof and leave the walls white.
The roof and valances are each a single design in the template: whatever you draw on the roof page, the Studio copies to all roof sections, and the valance design to all strips. Nine out of ten customers use the same artwork there, so you do not need to copy it by hand. The walls have separate pages, because their content differs more often.
A few rules that save corrections:
- The artwork must fill the area including the bleed (the grey frame around the area). White margins at the edge will remain visible at the seam.
- Keep logos, slogans and phone numbers within the safe area marked with purple marks in the margin.
- Colours in CMYK, Coated FOGRA39 profile, fonts converted to outlines. Dye sublimation delivers saturated colours, but very dark navy and black are best designed slightly lighter.
- Do not change the order or size of the pages in the template. The Studio recognises pages by their order and, if that does not match, by their size.
Step 7: view the tent from every side
Below the model you will find view buttons: Front, Perspective, Back and From above, plus zoom. The camera moves smoothly between shots and the tent rotates around its own axis, so it is easy to check whether the logo on the roof reads from outside and whether the lettering on the valance is cut off. You can also grab the model with your mouse or finger and rotate it freely.
The “Show outdoors” button in the top left corner places the tent against the backdrop of an outdoor event. It is a good test before showing the design to your manager: you can see the scale, the colours in daylight and whether the artwork stands out from its surroundings.
Step 8: the basket and what happens next
When the configuration is ready, the bottom of the panel shows the price, the lead time and the “Add to basket” button. The order includes the list of selected elements, the uploaded files or the completed PDF template, and previews of each element from the model. Our production department receives everything it needs and does not have to ask any follow-up questions.
Before printing, we always send you a visualisation by email for approval. We only start dye sublimation and sewing after you confirm. If you do not have a design, tick “Graphic design by Vitasystem” in the “Graphic design” section (€35.30 excl. VAT): we will prepare it from the logo, colours and copy you send us, and go to print after your approval.
Frequently asked questions
Can I save the configuration and come back to it later?
Yes. The configuration is saved in the basket together with the files. You can close the browser and complete the order the next day.
Does the Studio replace the file check?
The 3D model shows the artwork layout and colours approximately. We check resolution, bleed and colour profile in production on the files you uploaded. If anything needs correcting, we will contact you before printing.
I am ordering several tents with the same artwork. Do I have to design each one separately?
No. Set the quantity in the field next to the price. All units will get the same design and the same configuration of walls and equipment.
I already have a tent from you. Can I order just the walls?
Yes. Walls, half walls, the tablecloth and flags are options for the same frame. Select them in the Studio, upload your artwork and place the order, and we will match them to your frame.
Where to start
Open the 3 × 3 m tent page, select the back wall and both sides, upload your logo to the roof and rotate the model. Five minutes is enough to see how the stand will look on site. If any questions come up along the way, your order contact will answer by chat or email, and with your first order we will help you choose the walls and weights for your event.



Comments
Loading comments…